Followers

Thursday, April 26, 2018

Exciting news and reminder of current promotions

     So, its official!  I have scheduled a Mother's Day Coffee and a Card event on May 9th at Rolling Thunder Roadhouse in Jonestown.  It will be an open house format anytime between 8am and 2pm.  Come order a coffee, bring it in to the airstream, make a card for Mother's Day all included for $5.  Will have 2 designs to choose from ( one that will include a motorcycle stamp set!).  Please give me a heads up if you're even thinking about attending this event.


     A heads up as a reminder that there are 2 big promotions that are going on right now that are almost over.  The first one that will be over as of May 10th is the Half off 2 months of Paper Pumpkin to new subscribers.  Only available as online subscriptions.  Use the coupon code: SAVEFIFTY0418.  Here is my personal link to subscribe:  https://www.paperpumpkin.com/en-us/sign-up/?demoid=65497.  The second big promotion going on is the Retired list.  The Stampin' Up calendar year is coming to an end.  This means that quite a few items will be retired and no longer available.  They are only available until they run out of stock.  This year they are also revamping the colors which means some colors are going away and new ones will be coming in.  So if any of these items are on your wish list, order them now before they are gone!  Here is the link to my personal store with these lists: https://www.stampinup.com/ecweb/default.aspx&dbwsdemoid=65497.

     Stampin' Over the Rainbow,
Tracey Gouraud


Monday, April 23, 2018

Tutorial for Join me for a cup gift set

     As promised, here is the tutorial for the projects in the Join me for a cup gift set that was part of the April blog hop for the SU Orphans demo group.


Gift bag

products used:  Coffee break DSP 12x12 sheet
                          Gift bag punch board
                           ribbon
                           scrap of  Whisper White CS
                           chocolate chip ink
                           coffee cafe stamp set
                           gold foil
1.  make gift bag using gift bag punch board and Large and 12" settings.  Before folding and taping, score at 1" at side opposite punches.  Fold over to make top border of bag.  Use Reverse punch on folded edge to make holes for threading ribbon through.  Fold and burnish on scores to make bag.  Adhere bottom tabs to finish bag.  Thread ribbon through holes at top and tie knot on side.

2.  Stamp sentiment and cup on scrap of Whisper White.  Use framelit to die  cut cup.  Adhere to scrap of gold foil (I found mine from a ham wrapper).  Adhere foil to front of bag.

TADA

Drink holder

products used: cardboard drink holder
                         coffee break DSP
                         Snail
1.  Measure and cut DSP to bottom portion of drink holder.  Adhere to drink holder.

TADA

Tea Towel

products used: tea towel
                         Coffee cafe stamp set
                         Tuxedo black ink
                         dryer
                         Stamparatus

1.  Place folded towel on Stamparatus.  Determine placement of sentiment, ink up stamp and stamp.
decide placement of cup around sentiment, ink stamp and stamp.  repeat with foam.

2.  Place towel in dryer and dry for 30 minutes.  This should help set the ink.

TADA

Life Happens chalk board

products used:  chalk board from craft store
                          Coffee break DSP
                          Coffee framelits
                           Versamark ink
                           Clear embossing powder
                           Copper embossing powder
                           Chocolate chip ink
                           Coffee beans
                           fine tip glue pen
                            push pins
                           ribbon

1.  Use little coffee cup framelit and die cut coffee cups.  ink cups up with versamark and clear embossing powder. use heat tool to emboss cups.  

2.  Rub versamark and chocolate chip ink on wooden sides of frame. Emboss with clear embossing powder.

3.  Curl embossed cups.  Adhere to chalk board sides with fine tip glue pen.

4.  Put multiple dots of fine tip glue on bottom wood edge of chalk board and adhere multiple aromatic coffee beans.  Let dry.

5.  Using push pins attach ribbon to top corners of chalkboard. 

6.  Stamp sentiment in versamark on chalkboard.  use copper embosKeesing powder to emboss.

TADA

      Keep in mind that the bundle price (with 10% discount) and the DSP are retiring at the end of May. This means if the DSP runs out, it won't be there any more. If you want it, order it now. Use the April Hostess code: GYZKC2YW if your order is under $150. You will get a free gift from me.


Product List

Stampin' Over the Rainbow,

Tracey Gouraud


Sunday, April 22, 2018

I'm really close to my goal! Let's plan a Coffee and a card!

Ok gang, I'm really close to my goal and need another customer to order this week.  Everyone who helps me make my goal will be given a gift.  I'm also teaching my card class tomorrow at Lakeline Oaks Retirement.  They really enjoy making cards.  Here is what they will be making:


I'm now planning a Coffee and a Card event for any local folks.  This event will be held at Rolling Thunder Roadhouse in the Airstream.  I'm looking at the first week in May.  Would like input for what day more people would be interested in.  Cost would be $5 and include a cup of coffee and making a card.  I'm choosing Mother's Day as the theme, but the card could also be a birthday card or congratulations.  Will also have a Biker option (Yes, there are stamps of Motorcycles!).  Will offer 2 cards for $8.  Please comment on here what day and or time of day would work for you that week.

Stampin' Over the Rainbow,
Tracey Gouraud

Wednesday, April 18, 2018

Join me for a cup gift set


     Welcome to my second monthly blog hop. This month's theme is the Coffee Break suite which includes Coffee Break DSP, Coffee Cup framelits and the Coffee Cafe stamp set.  The Bundle price for the bundle of the stamp set and the framelits, item #145331 for $45.75 will be retiring at the end of May, so save now and buy now.  Our team includes Stampin' Up independent demonstrators from Australia, the UK, Canada, and the good old United States of America.  So, grab a cup of coffee and enjoy the inspiration we are sharing with you.  If you hopped here from Elizabeth Green, I'm sure she had a great project, hope you left her a comment and or shared her project with your friends.  If you created a project with any of the products in this hop, please share them with me in the comments.  I'm always looking for inspiration for more projects to make.
     This month is my birthday month and I love a good cup of coffee and enjoy sharing it with a good friend.  I've created a gift package based on coffee for this post.  I will share the tutorial some time next week, so stay tuned to this blog for it.  I created a gift bag with DSP to hold a bag of coffee beans (can't you just smell it?!).  I also decorated dish towel and a drink holder.  My favorite item in this gift is the chalk board that can be hung in a coffee area for messages and to remind one that coffee helps.  And by coffee helps I mean, C(hrist) O(ffers) F(orgiveness) F(or) E(everyone) E(everywhere).
     
     The next button below should send you on your way to the next hopper, Emilie Poncelet.  Please remember to leave me some birthday wishes before you get to her post and continue thru the rest of the inspiring posts.

April - Coffee Break - Team member links


                                 Tracey Gouraud  < YOU ARE HERE


     The item list below are the products sold by Stampin' Up and can be purchased thru my online store by clicking on one of the items.  The other items are available elsewhere and will be explained in the tutorial at a later date on this blog.  Thank you for enjoying my blog post and inspiration.  If you don't have a demonstrator and live in the United States, and would like to either purchase the items below or receive a catalog, contact me.

Stampin' Over the Rainbow,
Tracey 


Product List


Tuesday, April 17, 2018

New items on the Clearance rack - In honor of my birthday

Stampin' Up has put new items on the clearance rack today.  In honor of my birthday month,  any order this month, will get an item off the clearance rack worth 5% of their order from me.  Use the hostess code: GYZKC2YW if your order is under $150.  You will earn another free item from me for this.

Click here to go to the clearance rack.  Remember to ask for me as your demo on this.

If I make $200 more in sales this month, everyone who helps me get there will earn a special gift from me.

Stampin' Over the Rainbow,
Tracey Gouraud

Monday, April 16, 2018

Last tutorial for the Anything But an Envelope projects


     This is the last tutorial for these items.  It will be for items D and F.  

File Folder (Item D)

1.  Start with a piece of cardstock measuring 8" x 5 1/2".  Using the Envelope Punch Board on both short ends and opposite corners, line up edge at center of punch area.  Punch.  Slide to 3" and punch.  Score using Trimmer on the long side at 4 1/4".  Line up both punched edges on trimmer with middle punch bottom on trimmer channel.  Trim off part that isn't the tab.


2.  Using the Big Shot and the Basket texture embossing folder, emboss the shorter side of the card.


3.  Take a strip of DSP 1 1/2" x 12" as belly band.  Wrap around front of fold folder so that both ends meet at back of folder and creasing at edges of folder.  Adhere one end on top of other end.  Stamp Octopus on scrap of Whisper White in Fresh Fig and 1st part of sentiment above  octopus and rest below.  Punch out using Everyday Label Punch and adhere to center of belly band.

4.  Take piece of Crumb Cake 3 3/4" x 5 1/8" and using punch board, round all 4 corners.  Take a piece of Whisper White 3 1/2" x 4 7/8", round corners and adhere in center of Crumb Cake piece.  Insert into file folder.

TADA


Mason Jar Gift Card holder (Item F)

1.  Start with a piece of Dapper Denim cardstock (retiring item so if you like it, order it now before it runs out) 3" x 11".  Score on 11" side at 4 1/4", 5 1/2" and 6 3/4".

2.  Using the Envelope Punch Board, and the O in Score and the N in Line on the second Score Line label, and punch.  Do this on all 4 corners.

3.  Fold at first fold and use corner rounder on EPB to round both corners on the fold, you are punching thru 2 layers.  Unfold and fold on last fold and repeat.

4.  Unfold and fold at middle score.  On EPB insert fold into punch area and line up edge at left side of punch "bubble" and punch thru 2 layers.  Flip to other edge and repeat.

5.  Using Paper Snips, cut mountain off between both punches.  Stamp background stamp on front of mason card.  

6.  With stamped front facing up, put line of glue on both edges of center section.  Fold both center sections together and hold till glue holds.

7.  Stamp sentiment on scrap piece of Whisper White cardstock and punch out.  If desired, layer on other piece of punched cardstock.  Adhere on front of mason jar.  Folding jar so that the glued center is inside the front and back of the mason jar.

8.  I used foil pieces (2 3/4" x 3/4") to adhere to top of mason jar.  Snip off small amount hanging out between 2 foil pieces.  Insert gift card into center  holder and then use ribbon or twine to loop around under the foil lid and tie in front to hold mason jar closed.

TADA

Thank you for following my tutorials.  If you make any of these projects, please share in the comments or on my facebook page  (Stampin' Over the Rainbow with Tracey G).  If you don't have a demonstrator and live in the United States, use the catalog link on the side to order from my online store.  If your order is less than $150, please use the hostess code at the top of the rainbow.  That way, I'll be able to send you a free gift from me.  If you would like a catalog, let me know and I'll send you one.

Stampin' Over the Rainbow,
Tracey Gouraud

Sunday, April 15, 2018

Anything but an Envelope continued


     So, yesterday, I started this post and gave the tutorials for items C, E and G.  Today I'll be sharing the tutorials for items A and B.  Tomorrow will hopefully be posting the tutorials for items D and F.  


Pouch Box (Item A)

  This project was inspired by Tulip's Touch of http://tulipstouchstamps.stampinup.net. She was inspired by Pootles from the UK. Her video was very easy to follow and I enjoyed making mine and putting some tea bags in it.  So, here goes my version:

1.  Start with a 6" x 6" piece of DSP.  Using the Envelope Punch board, on one side, punch and score at 1 1/2", 3" and 4 1/2".  Then repeat on all the other sides.  Use the corner rounder of the EPB and round each of the corners.

2.  Using Paper Snips, at each of the middle notches, cut each score to the next score line.

3. Fold on all the score lines.  Attach Tear & Tape to each of the tabs on both sides of the center punch on the side that will be the outside of the pouch.  Curl all 4 tabs using bone folder to the outside.  

4.  Remove tape backing one tab at a time.  First one fold tab and adhere to inside of diamond matching corner to edge.  Fold other side tab on top of this one using thumb on outside to curve the joining area.
5.  Continue this on each corner.  .

6.  Use ribbon or cord to tie around the pouch.  Fill with treat.  TADA!

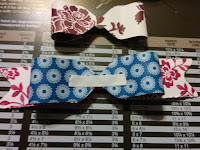
EPB Bow - Item B

1.  3 strips of DSP:  1 strip that is 1" x 6" and 2 strips that are 1" x 5".  These can be all the same DSP or each one can be a different DSP.


2.  On the long side of each strip, using the envelope punch board, find the center and punch and flip and punch at the same mark.

3.  On one of the short strips, on the short ends, punch in center.  On other 2, round all 4 corners.

4.  Using bone folder, curl the 2 strips with rounded corners.  Put Tear & Tape on ends of these strips.

5.  Remove tape backing and bring each end toward center and match rounded edges to rounded part of center of bow and adhere.  Put Tear & Tape thru center of other strip but not whole length of strip.

6.  Remove tape backing and put longest bow upside down on center of long strip with centers matching, adhere.  Add shorter piece of tear and tape on top of this and put shorter bow on top upside down and adhere.


TADA!


Stampin' Over the Rainbow,
Tracey Gouraud